Ignore Snyk Vulnerability
Overview
This guide demonstrates how to implement a self-service action in Port that allows you to ignore a Snyk vulnerability.
Prerequisites
- Complete the onboarding process.
- Access to your Snyk organization with permissions to manage vulnerabilities.
- Optional - Install Port's Snyk integration.
Set up data model
If you haven't installed Port's Snyk integration., you will need to manually create blueprints for Snyk project and Snyk vulnerability.
We highly recommend that you install the Snyk integration to have such resources automatically set up for you.
Create the Snyk project blueprint
-
Go to your Builder page.
-
Click on
+ Blueprint. -
Click on the
{...}button in the top right corner, and chooseEdit JSON. -
Add this JSON schema:
Snyk Project Blueprint (Click to expand)
{
    "identifier": "snykProject",
    "title": "Snyk Project",
    "icon": "Snyk",
    "schema": {
    "properties": {
        "url": {
        "type": "string",
        "title": "URL",
        "format": "url",
        "icon": "Snyk"
        },
        "businessCriticality": {
        "title": "Business Criticality",
        "type": "array",
        "items": {
            "type": "string",
            "enum": [
            "critical",
            "high",
            "medium",
            "low"
            ]
        },
        "icon": "DefaultProperty"
        },
        "environment": {
        "items": {
            "type": "string",
            "enum": [
            "frontend",
            "backend",
            "internal",
            "external",
            "mobile",
            "saas",
            "onprem",
            "hosted",
            "distributed"
            ]
        },
        "icon": "Environment",
        "title": "Environment",
        "type": "array"
        },
        "lifeCycle": {
        "title": "Life Cycle",
        "type": "array",
        "items": {
            "type": "string",
            "enum": [
            "development",
            "sandbox",
            "production"
            ]
        },
        "icon": "DefaultProperty"
        },
        "criticalOpenVulnerabilities": {
        "icon": "Vulnerability",
        "type": "number",
        "title": "Open Critical Vulnerabilities"
        },
        "highOpenVulnerabilities": {
        "icon": "Vulnerability",
        "type": "number",
        "title": "Open High Vulnerabilities"
        },
        "mediumOpenVulnerabilities": {
        "icon": "Vulnerability",
        "type": "number",
        "title": "Open Medium Vulnerabilities"
        },
        "lowOpenVulnerabilities": {
        "icon": "Vulnerability",
        "type": "number",
        "title": "Open Low Vulnerabilities"
        },
        "tags": {
        "type": "array",
        "title": "Tags",
        "icon": "DefaultProperty"
        },
        "targetOrigin": {
        "type": "string",
        "title": "Target Origin"
        }
    },
    "required": []
    },
    "mirrorProperties": {},
    "calculationProperties": {},
    "aggregationProperties": {},
    "relations": {}
} -
Click
Saveto create the blueprint.
Create or update the Snyk vulnerability blueprint
In this setup, we will create or update the Snyk Vulnerability blueprint.
Skip to the update blueprint section if you already have the blueprint.
Create the Snyk vulnerability blueprint
If you have not installed Port's Snyk integration, you need to manually create the Snyk Vulnerability blueprint. Follow the steps below to add the blueprint:
-
Go to your Builder page.
-
Click on
+ Blueprint. -
Click on the
{...}button in the top right corner, and chooseEdit JSON. -
Add this JSON schema:
Snyk Vulnerability Blueprint (Click to expand)
{
"identifier": "snykVulnerability",
"title": "Snyk Vulnerability",
"icon": "Snyk",
"schema": {
    "properties": {
    "score": {
        "icon": "Star",
        "type": "number",
        "title": "Score"
    },
    "packageNames": {
        "items": {
        "type": "string"
        },
        "type": "array",
        "title": "Package Names",
        "icon": "DefaultProperty"
    },
    "packageVersions": {
        "icon": "Package",
        "title": "Package Versions",
        "type": "array"
    },
    "type": {
        "icon": "DefaultProperty",
        "title": "Type",
        "type": "string",
        "enum": [
        "vuln",
        "license",
        "configuration",
        "config",
        "custom",
        "code",
        "cloud",
        "package_vulnerability"
        ]
    },
    "severity": {
        "icon": "Alert",
        "title": "Issue Severity",
        "type": "string",
        "enum": [
        "low",
        "medium",
        "high",
        "critical"
        ],
        "enumColors": {
        "low": "green",
        "medium": "yellow",
        "high": "red",
        "critical": "red"
        }
    },
    "url": {
        "icon": "Link",
        "type": "string",
        "title": "Issue URL",
        "format": "url"
    },
    "publicationTime": {
        "type": "string",
        "format": "date-time",
        "title": "Publication Time",
        "icon": "DefaultProperty"
    },
    "status": {
        "title": "Status",
        "icon": "",
        "type": "string",
        "enum": [
        "open",
        "resolved"
        ],
        "enumColors": {
        "open": "red",
        "resolved": "green"
        }
    },
    "issueKey": {
        "type": "string",
        "title": "Issue Key"
    }
    },
    "required": []
},
"mirrorProperties": {},
"calculationProperties": {},
"aggregationProperties": {},
"relations": {
    "project": {
    "title": "Project",
    "target": "snykProject",
    "required": false,
    "many": false
    }
}
} -
Click
Saveto create the blueprint.
Update the Snyk vulnerability blueprint
If you have installed Port's Snyk integration, you need to add the issueKey property to the Snyk Vulnerability blueprint. Follow the steps below to add the property:
-
Go to your Builder page.
-
Search for the
Snyk Vulnerabilityblueprint. -
Click on the
{...} Edit JSONbutton. -
Copy and paste the following JSON snippet into properties.
Issue key property (click to expand)
"issueKey": {
  "title": "Issue Key",
  "type": "string"
} -
Click
Saveto update the blueprint.
Update Synk integration configuration
-
Go to your Data Source page.
-
Select the Snyk ocean integration.
-
Add the following YAML block into the editor to update the vulnerability data:
Snyk Vulnerability Configuration (Click to expand)
- kind: vulnerability
    selector:
    query: 'true'
    port:
    entity:
        mappings:
        identifier: .id
        title: .attributes.title
        blueprint: '"snykVulnerability"'
        properties:
            score: .attributes.risk.score.value
            packageNames: [.attributes.coordinates[].representations[].dependency?.package_name
            | select(. != null)]
            packageVersions: [.attributes.coordinates[].representations[].dependency?.package_version
            | select(. != null)]
            severity: .attributes.effective_severity_level
            url: ("https://app.snyk.io/org/" + .attributes.key | tostring)
            publicationTime: .attributes.created_at
            status: .attributes.status
            type: .attributes.type
            issueKey: .attributes.key
        relations:
project: .relationships.scan_item.data.id -
Click
Save & Resyncto apply the mapping.
Implementation
You can ignore Snyk vulnerability by leveraging Port's synced webhooks and secrets to directly interact with Snyk's API.
Add Port secrets
If you have already installed Port's Snyk integration, these secrets should already exist in your portal.
To view your existing secrets:
- Click on the
...button in the top right corner of your Port application. - Choose Credentials, then click on the
Secretstab.
To add these secrets to your portal:
-
Click on the
...button in the top right corner of your Port application. -
Click on Credentials.
-
Click on the
Secretstab. -
Click on
+ Secretand add the following secrets:_SNYK_TOKEN: Your Snyk API key._SNYK_ORGANIZATION_ID: Your Snyk organization ID.
Set up self-service action
Follow these steps to create the self-service action:
-
Head to the self-service page.
-
Click on the
+ New Actionbutton. -
Click on the
{...} Edit JSONbutton. -
Copy and paste the following JSON configuration into the editor.
Ignore Snyk Vulnerability (Click to expand)
{
"identifier": "ignore_snyk_vulnerability",
"title": "Ignore Snyk Vulnerability",
"icon": "Snyk",
"description": "Ignore a Snyk vulnerability with reason and expiration date.",
"trigger": {
    "type": "self-service",
    "operation": "DAY-2",
    "userInputs": {
    "properties": {
        "reasonType": {
        "type": "string",
        "title": "Reason Type",
        "enum": [
            "wont-fix",
            "not-vulnerable",
            "temporary-ignore"
        ],
        "enumColors": {
            "wont-fix": "lightGray",
            "not-vulnerable": "lightGray",
            "temporary-ignore": "lightGray"
        }
        },
        "ignoreReason": {
        "type": "string",
        "title": "Ignore Reason"
        },
        "expiration": {
        "type": "string",
        "enum": [
            "Does not expire",
            "Custom expiration date"
        ],
        "title": "Expiration"
        },
        "expirationDate": {
        "type": "string",
        "enum": [
            "30 days",
            "60 days",
            "90 days",
            "180 days",
            "270 days",
            "365 days"
        ],
        "visible": {
            "jqQuery": ".form.expiration == \"Custom expiration date\""
        },
        "title": "Expiration Date"
        }
    },
    "required": [
        "reasonType",
        "expiration"
    ],
    "order": []
    },
    "blueprintIdentifier": "snykVulnerability"
},
"invocationMethod": {
    "type": "WEBHOOK",
    "url": "https://api.snyk.io/v1/org/{{ .secrets._SNYK_ORGANIZATION_ID }}/project/{{ .entity.relations.project }}/ignore/{{ .entity.properties.issueKey }}",
    "agent": false,
    "synchronized": true,
    "method": "POST",
    "headers": {
    "Authorization": "token {{ .secrets._SNYK_TOKEN }}",
    "Content-Type": "application/json"
    },
    "body": {
    "ignorePath": "",
    "reason": "{{ .inputs.ignoreReason }}",
    "reasonType": "{{ .inputs.reasonType }}",
    "ignoredBy": {
        "name": "{{ .trigger.by.user.firstName }}",
        "email": "{{ .trigger.by.user.email }}",
        "id": "{{ .trigger.by.user.id }}"
    },
    "disregardIfFixable": false,
    "{{ if (.inputs | has(\"expirationDate\")) then \"expires\" else null end }}": "{{ if (.inputs | has(\"expirationDate\")) then (( .inputs.expirationDate | sub(\" days\"; \"\") | tonumber) * 86400 | now + . | strftime(\"%Y-%m-%dT%H:%M:%S%z\")) else null end }}",
    "created": "{{ .trigger.at }}"
    }
},
"requiredApproval": false
} -
Click
Save.
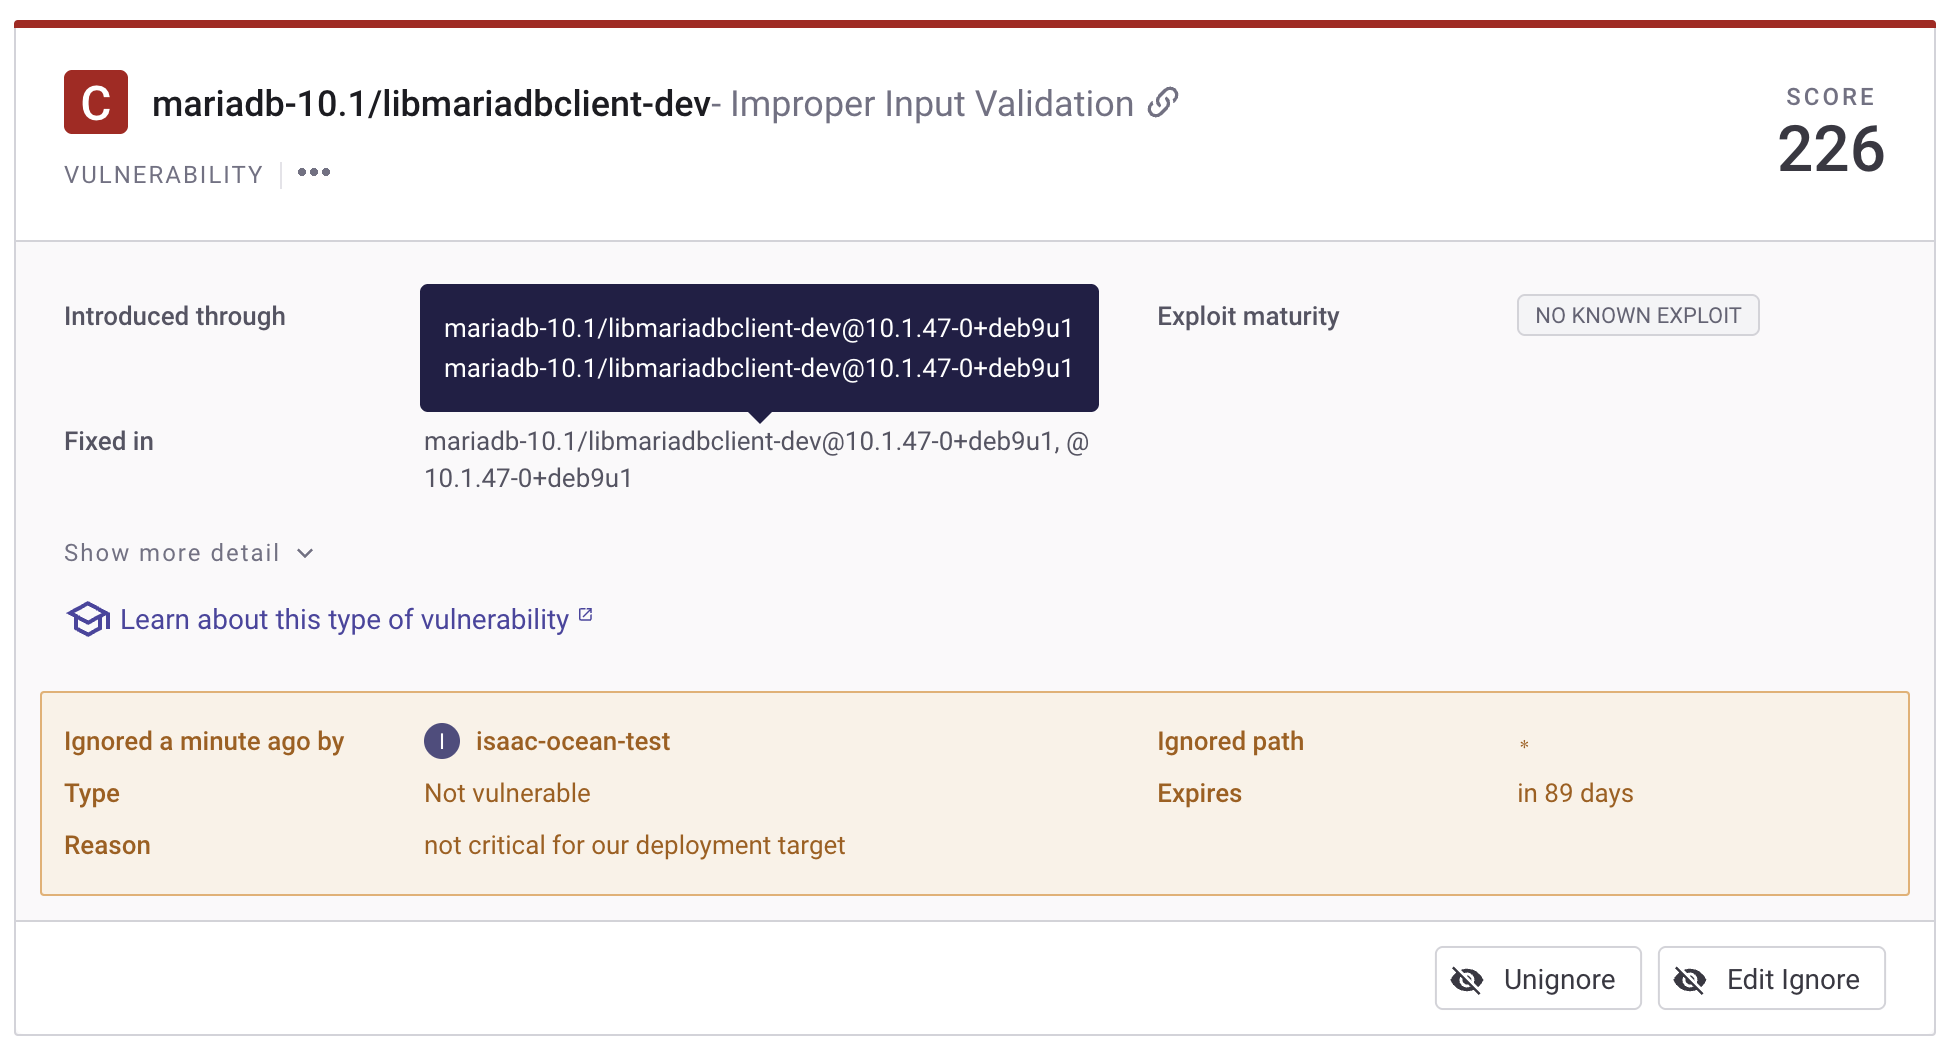
Now you should see the Ignore Snyk Vulnerability action in the self-service page. 🎉
Let's test it!
-
Head to the self-service page of your portal.
-
Choose the
Ignore Snyk Vulnerabilityaction: -
Enter the required information:
- Select the vulnerability entity.
- Select the reason type.
- Select expiration date.
- Enter the ignore reason.
-
Click on
Execute. -
Done! Wait for the issue to be ignored in Snyk. 🎉